Ok, well, that definitely isn’t true. Plenty of things preceded Envoy, nginx, Apache, HAProxy etc. So, what exactly is Envoy? From the good folks at Envoy we get the description:
“Envoy is an open source edge and service proxy designed for cloud-native applications.”
— envoy.io
Basically, Envoy works as well as a proxy at the edge of your network as it does handling service to service communication between (micro)services. It is powerful enough to handle outbound traffic from your Intranet and light-weight enough to be run along side every instance of your services.
But, if you’ve landed here, there is a good chance you aren’t looking for a description of Envoy, but rather how to use and configure it.
If you’d like to follow along with the examples here I’d recommend downloading func-e. This will allow you to quickly spin up and test different versions of envoy. The samples below can be saved as .yaml and passed into the func-e CLI:
func-e run -c config.yamlOverview
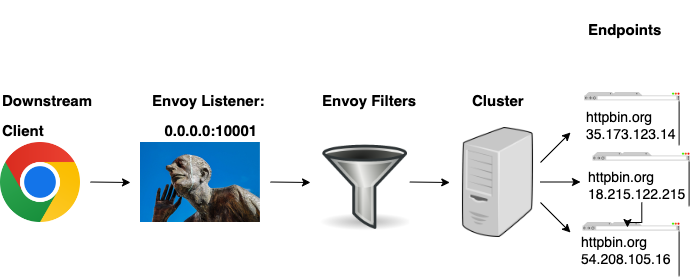
Let’s dive in with some basic terminology you will need:
| LISTENER | Port combination (or Unix domain socket) that clients can connect to |
| FILTERS | Used to manipulate traffic |
| CLUSTER | Destination for traffic, load balanced |
| ENDPOINTS | Destination for the traffic sent to Cluster |
| ROUTES | Rules to match client requests, hosts, paths, etc (L7 Traffic) |
There are different paths a request can take depending on the type of traffic, Layer 4 (TCP proxy vs Layer 7 (HTTP Proxy).
Layer 4
A downstream client will send a request to the Envoy listener. If there are filters defined, they will be invoked. After the filters are invoked, the traffic is sent to a cluster which will load balance the traffic over the associated endpoints.

Layer 7
In the case of HTTP proxying (L7) traffic we also introduce a route object. With the ability to decode HTTP traffic Envoy now has awareness of hosts, paths, query parameters, etc. This criteria can be used to match specific requests and take the appropriate actions.

So how does this all look when translated to Envoy Config? We can define the configuration using JSON or YAML. For readability, we will stick with YAML.
Listeners
The definition here will create a listener on port 10001 directed to ANY IP address.
static_resources:
  listeners:
  - name: listener_0
    address:
      socket_address:
        address: 0.0.0.0
        port_value: 10001
While this is a good start, in actuality, this alone with do nothing. In fact, if we tried to run with the config Envoy would throw an error as we must specify a filter chain, even if it is blank. This example will allow Envoy to start, but still provides not real value outside holding open a port.
static_resources:
  listeners:
    - name: listener_0
      address:
        socket_address:
          address: 0.0.0.0
          port_value: 10001
      filter_chains: {}
We can confirm that through netstat
bash-3.2$ netstat -na | grep 10001
tcp4       0      0  *.10001           *.*                              LISTEN
Filters
Now that we are accepting traffic on port 10001, ideally, we need to do something with it. For a very basic example, we will create a TCP Proxy filter. We will not do any inspection or modification of the traffic, simply pass it through to a destination. Building on the previous example, we will update the filter chain with the TCP Proxy filter.
static_resources:
  listeners:
    - name: listener_0
      address:
        socket_address:
          address: 0.0.0.0
          port_value: 10001
      filter_chains:
        - filters:
            - name: envoy.filters.network.tcp_proxy
              typed_config:
                "@type": type.googleapis.com/envoy.extensions.filters.network.tcp_proxy.v3.TcpProxy
                stat_prefix: destination
                cluster: cluster_httpbin
This provides us with a minimal configuration to run Envoy, but again, nothing special is going to happen here. We still need to define a cluster and endpoints to send the traffic to. In the above, we reference the cluster name cluster_httpbin. Let’s look at how we define the cluster.
static_resources:
  listeners:
    - name: listener_0
      address:
        socket_address:
          address: 0.0.0.0
          port_value: 10001
      filter_chains:
        - filters:
            - name: envoy.filters.network.tcp_proxy
              typed_config:
                "@type": type.googleapis.com/envoy.extensions.filters.network.tcp_proxy.v3.TcpProxy
                stat_prefix: destination
                cluster: cluster_httpbin
  clusters:
    - name: cluster_httpbin
      type: LOGICAL_DNS
      load_assignment:
        cluster_name: cluster_httpbin
        endpoints:
          - lb_endpoints:
              - endpoint:
                  address:
                    socket_address:
                      address: www.httpbin.org
                      port_value: 80
A name is defined, cluster_httpbin, a DNS discovery type is provided (LOGICAL_DNS) and endpoints are created. Remember, the endpoints will be the destinations that the cluster use to load balance traffic over. In this case we only have a single endpoint so it will receive 100% of the traffic.
If we attempt to curl port 10001 on localhost, we should receive an HTTP 200 response from httpbin.org.
bash-3.2$ curl http://localhost:10001/ -I
HTTP/1.1 200 OK
Date: Thu, 07 Jul 2022 17:50:26 GMT
Content-Type: text/html; charset=utf-8
Content-Length: 9593
Connection: keep-alive
Server: gunicorn/19.9.0
Access-Control-Allow-Origin: *
Access-Control-Allow-Credentials: true
This is a very basic example showcasing the core components of the Envoy config. In later articles we will explore more about Layer 7 traffic, manipulating it through filters, load balancing to multiple endpoints and debugging Envoy.